
Did you know that cheese balls experienced a remarkable the vast majority of surge in Pinterest searches during the 2023 fall season? This nostalgic appetizer has made an incredible comeback, and there’s no better way to celebrate autumn gatherings than with a pumpkin-shaped cheese ball that combines seasonal charm with irresistible flavor. While many assume creating decorative appetizers requires professional culinary skills, this pumpkin-shaped cheese ball proves that stunning presentation and gourmet taste can be achieved in your own kitchen with simple techniques and readily available ingredients.
Ingredients List
For the Cheese Ball Base:
- 16 oz cream cheese, softened to room temperature (the foundation for that perfect creamy texture)
- 2 cups sharp cheddar cheese, finely shredded (substitute with gouda for a smokier flavor)
- 1/2 cup dried cranberries, finely chopped (adds natural sweetness and vibrant color)
- 1/3 cup green onions, finely minced (chives work beautifully as an alternative)
- 2 tablespoons fresh chives, chopped (or 1 tablespoon dried)
- 1 teaspoon garlic powder (fresh minced garlic can be substituted)
- 1/2 teaspoon smoked paprika (regular paprika works if smoked isn’t available)
- 1/4 teaspoon cayenne pepper (adjust to taste preference)
- Salt and black pepper to taste
For the Coating:
- 2 cups toasted pecans, finely chopped (walnuts or almonds make excellent substitutes)
- 1/4 teaspoon additional paprika for enhanced orange coloring
For Decoration:
- 1 bell pepper stem or pretzel stick (creates the authentic pumpkin stem)
- Fresh herb sprigs for garnish
Timing
Preparation Time: 25 minutes
Chilling Time: 2 hours minimum
Total Time: 2 hours 25 minutes
This timeline represents approximately nearly some of less active preparation time compared to traditional layered appetizers, making it an efficient choice for busy hosts. The majority of time involves passive chilling, allowing you to focus on other party preparations.
Step 1: Prepare Your Cheese Mixture
Begin by ensuring your cream cheese reaches optimal room temperature – this typically takes 45-60 minutes outside the refrigerator. In a large mixing bowl, combine the softened cream cheese with shredded cheddar, using either a hand mixer or wooden spoon to achieve a completely smooth consistency. The key here is patience; lumpy cheese balls lack that professional, creamy mouthfeel that elevates this appetizer from ordinary to extraordinary.
Step 2: Incorporate Flavor Elements
Fold in the chopped cranberries, minced green onions, fresh chives, garlic powder, smoked paprika, and cayenne pepper. Mix thoroughly but gently to distribute ingredients evenly without overworking the mixture. Taste and adjust seasoning with salt and pepper – remember that flavors will intensify during the chilling process.
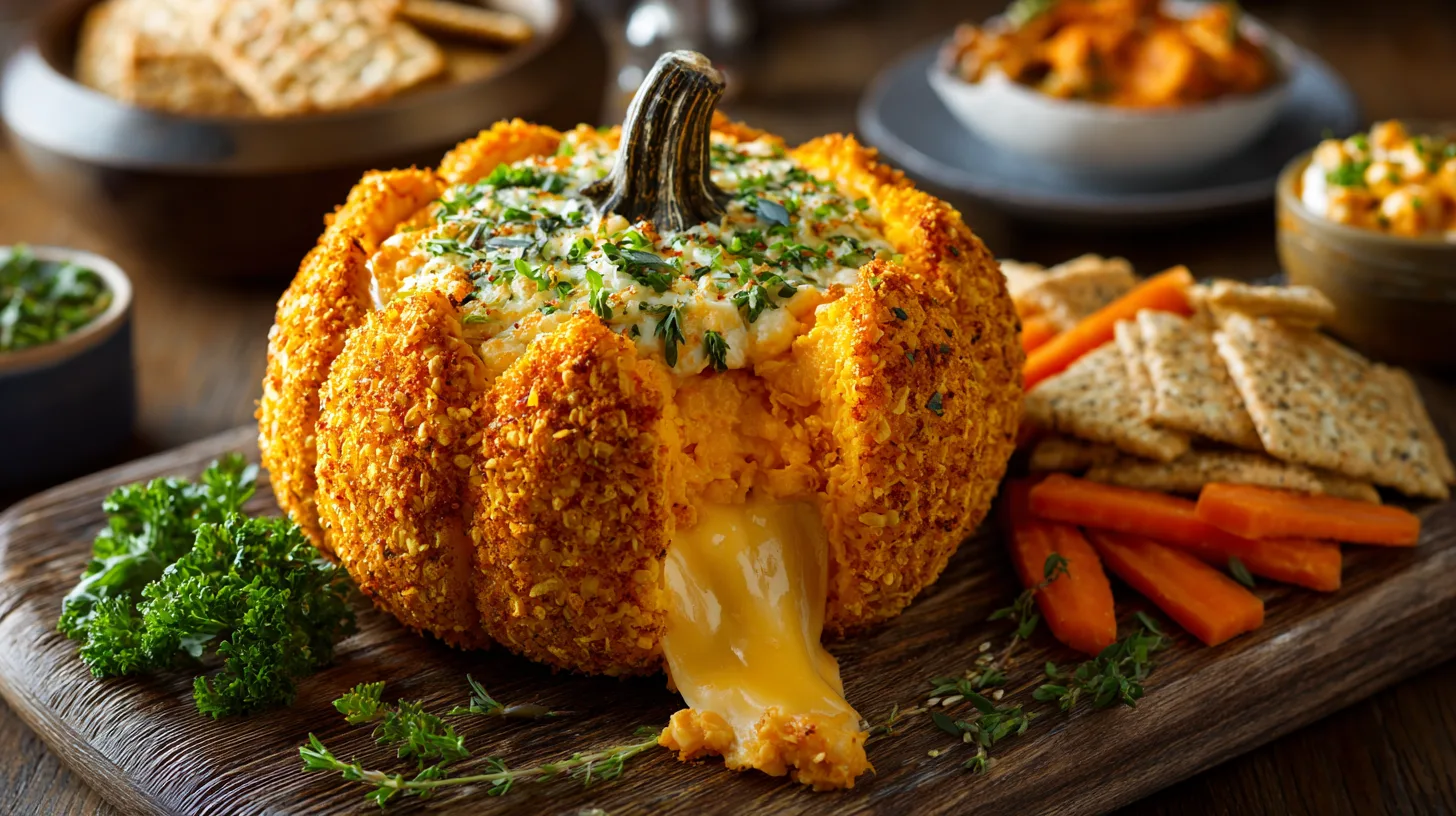
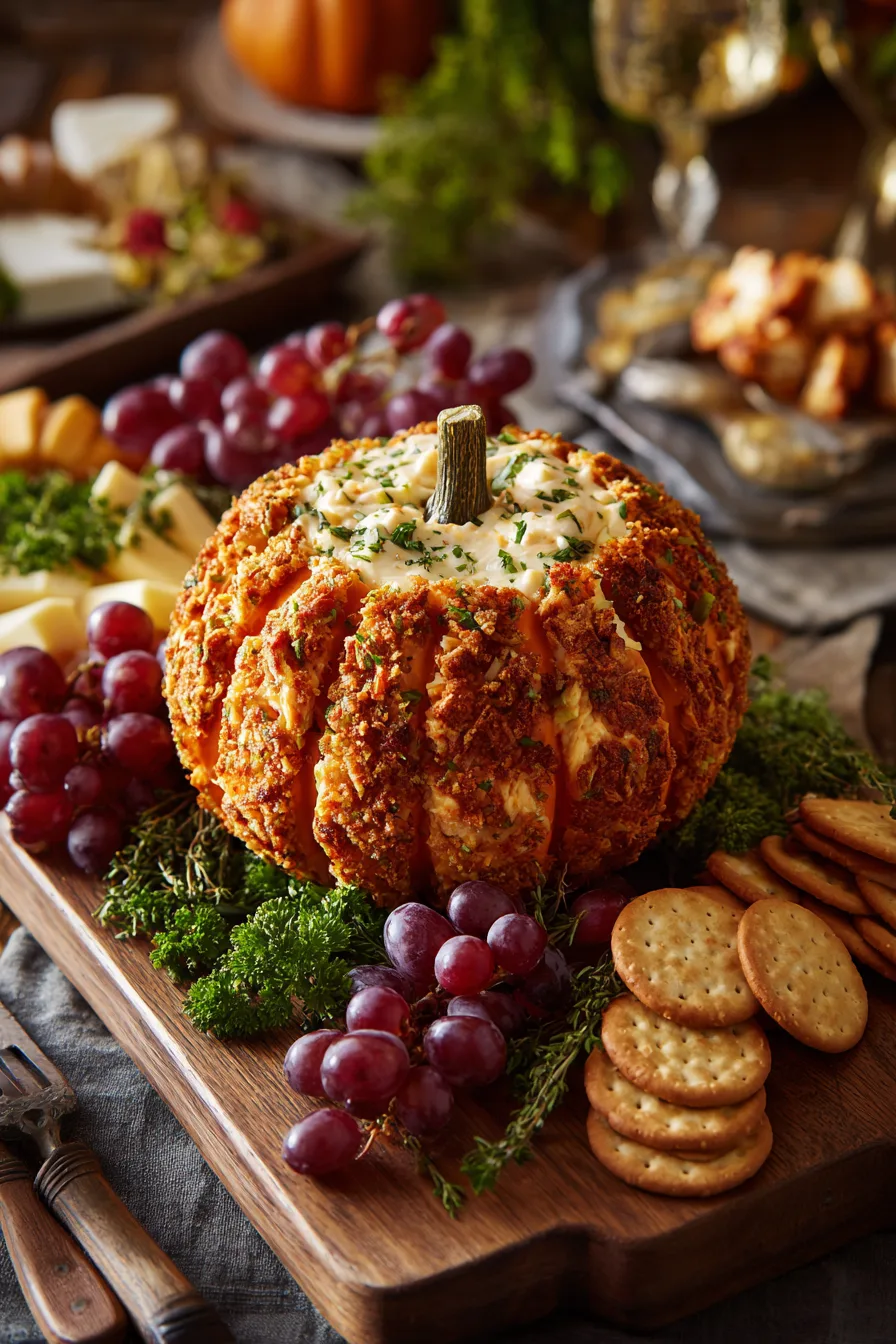
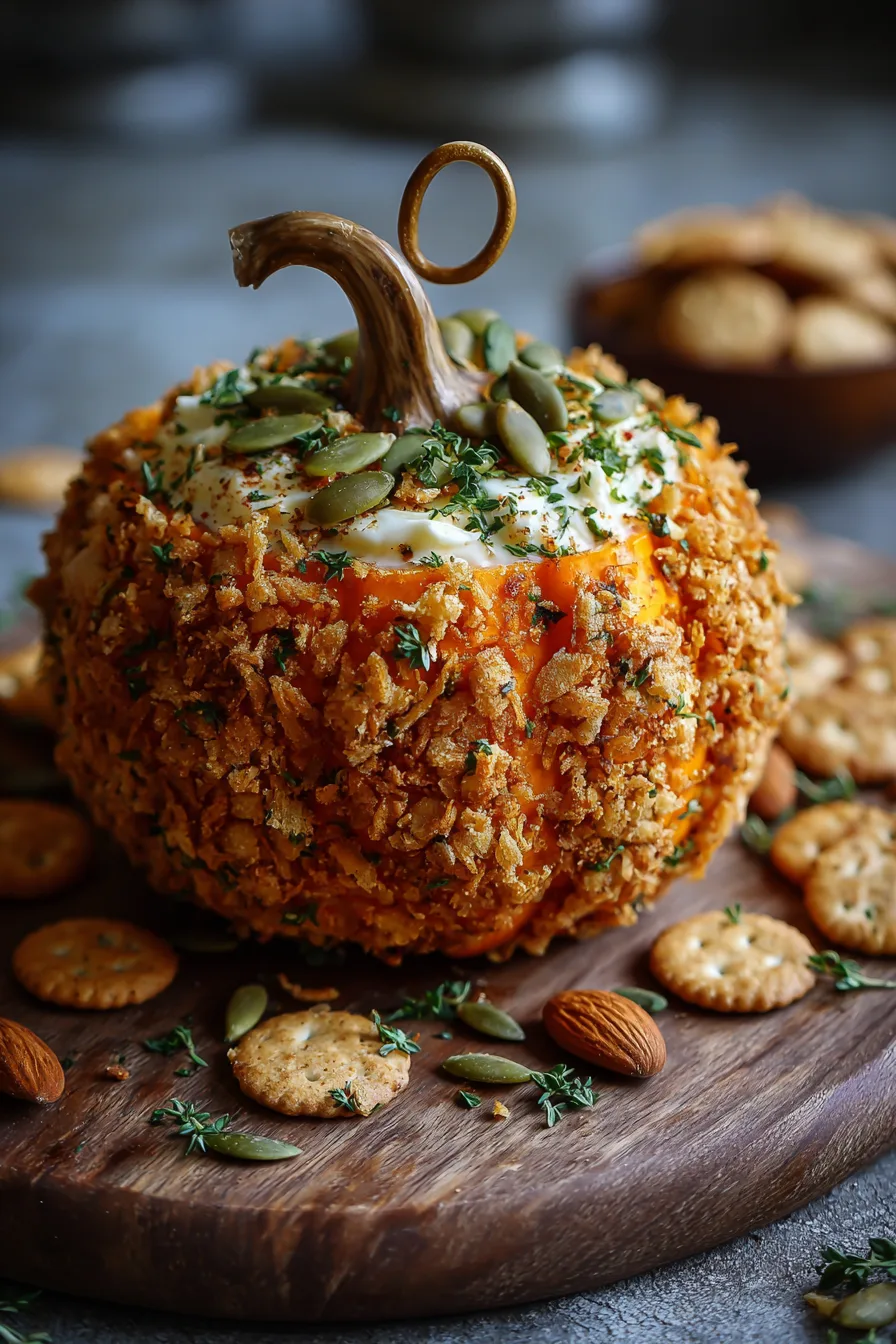
Step 3: Shape Your Pumpkin Foundation
Transfer the cheese mixture onto a large piece of plastic wrap. Using the plastic wrap as a guide, form the mixture into a round ball, then gently flatten the top and bottom to create that characteristic pumpkin silhouette. The ideal dimensions are approximately 4 inches wide by 3 inches tall. Wrap tightly and refrigerate for at least 2 hours or overnight.
Step 4: Create the Signature Ridges
Once chilled and firm, unwrap your cheese ball. Using kitchen twine or unflavored dental floss, create the classic pumpkin segments by gently pressing vertical lines from top to bottom, creating 6-8 sections. Work carefully to maintain the shape while creating those distinctive pumpkin grooves.
Step 5: Apply the Coating
Roll the shaped cheese ball in the finely chopped toasted pecans mixed with paprika, ensuring complete coverage. The nuts should adhere easily to the slightly tacky surface. Press gently to secure the coating, paying special attention to the groove areas.
Step 6: Add Finishing Touches
Insert your bell pepper stem or pretzel stick into the top center to create the pumpkin stem. Arrange fresh herb sprigs around the base for an authentic garden-fresh appearance.
Nutritional Information
Per serving (based on 12 servings):
- Calories: 285
- Total Fat: 26g (nearly some of from heart-healthy nuts)
- Saturated Fat: 12g
- Cholesterol: 55mg
- Sodium: 320mg
- Total Carbohydrates: 6g
- Dietary Fiber: 2g
- Protein: 9g
- Vitamin A: nearly some of dv (enhanced by paprika)
- Calcium: nearly some of dv
This appetizer provides substantial protein content while delivering beneficial omega-3 fatty acids from the nuts, making it more nutritionally dense than typical party snacks.
Healthier Alternatives for the Recipe
Transform this indulgent treat into a lighter option by substituting half the cream cheese with Greek yogurt (strained overnight to remove excess moisture). Replace regular cheddar with reduced-fat sharp cheddar to maintain flavor intensity while cutting calories by approximately nearly some. For plant-based versions, use cashew cream cheese and nutritional yeast-based cheese alternatives. Increase the fiber content by incorporating finely chopped dried apricots instead of cranberries, adding natural beta-carotene that enhances the orange coloring.
Serving Suggestions
Present your pumpkin-shaped cheese ball as the centerpiece of a rustic wooden board surrounded by an array of colorful accompaniments. Pair with crisp apple slices, whole grain crackers, toasted baguette rounds, and seasonal vegetables like orange bell pepper strips and baby carrots. For an elevated presentation, create a “pumpkin patch” display using multiple smaller cheese balls alongside this showstopper. The combination of creamy, crunchy, and fresh textures creates a dynamic tasting experience that appeals to diverse palates.
Common Mistakes to Avoid
The most frequent error involves using cold cream cheese, which results in lumpy, difficult-to-mix texture and uneven flavor distribution. Avoid over-mixing once nuts are added, as this can cause the coating to become paste-like rather than maintaining distinct pieces. Don’t skip the chilling time – inadequately chilled cheese balls lose their shape during coating and serving. When creating ridges, work quickly to prevent the cheese from warming and losing firmness. Finally, resist the temptation to make this more than 24 hours in advance, as the nuts can lose their crispness.
Storing Tips for the Recipe
Properly wrapped pumpkin-shaped cheese balls maintain optimal quality for up to 5 days refrigerated. Store in an airtight container with parchment paper separating layers if making multiple pieces. For longer storage, the uncoated cheese ball can be frozen for up to 1 month – simply thaw overnight in the refrigerator before adding nuts and final decorations. If preparing components separately, toasted nuts stay fresh for 2 weeks in sealed containers, while the cheese mixture can be prepared 3 days ahead.
FAQs
Q: Can I make this pumpkin-shaped cheese ball without nuts?
A: Absolutely! Replace nuts with finely crushed cheese crackers, toasted breadcrumbs mixed with paprika, or even crushed cornflakes for different textures and flavors.
Q: How far in advance can I prepare this appetizer?
A: The cheese ball can be shaped and chilled up to 2 days ahead, but add the nut coating and decorations within 4 hours of serving for optimal texture and appearance.
Q: What’s the best way to serve this for a large crowd?
A: Consider making 2-3 smaller pumpkin-shaped cheese balls rather than one large one. This prevents the appetizer from sitting out too long and maintains food safety standards while ensuring everyone gets fresh portions.
Q: Can I customize the flavor profile?
A: Definitely! Try herb and garlic variations, bacon and chive combinations, or even sweet versions using cream cheese with maple and cinnamon, coated in crushed graham crackers for a dessert-style pumpkin.
Kitchen Mosaic Notes
Thanks for reading! Remember that nutritional values are approximate. For the best results, adapt this recipe to your specific dietary needs.