

Did you know that garlic pita bread is searched for over 40,000 times monthly, yet most of home cooks believe it’s too complicated to make from scratch? This aromatic Mediterranean staple has captured hearts worldwide, but here’s the surprising truth: creating restaurant-quality garlic pita bread at home takes just 90 minutes and requires only eight simple ingredients. Contrary to popular belief, you don’t need a wood-fired oven or professional equipment to achieve that perfect balance of crispy exterior and pillowy-soft interior that makes garlic pita bread irresistible. Whether you’re planning a Mediterranean feast or simply craving authentic flavors, this comprehensive guide will transform your kitchen into a Middle Eastern bakery.

Ingredients for Perfect Garlic Pita Bread
Creating exceptional garlic pita bread starts with selecting premium ingredients that work in harmony. Here’s your complete shopping list with sensory-rich descriptions:
For the Pita Bread:
- 3 cups all-purpose flour (alternatively, use bread flour for chewier texture)
- 1 packet (2¼ teaspoons) active dry yeast
- 1 teaspoon granulated sugar
- 1 teaspoon fine sea salt
- 1 cup warm water (110°F – should feel like a comfortable bath)
- 2 tablespoons extra-virgin olive oil
For the Garlic Topping:
- 6 cloves fresh garlic, minced to aromatic perfection
- 4 tablespoons unsalted butter, softened (or vegan butter for plant-based option)
- 2 tablespoons fresh parsley, finely chopped for vibrant color
- ½ teaspoon sea salt
- Optional: 2 tablespoons grated Parmesan cheese for extra richness
Substitution Notes: Replace all-purpose flour with whole wheat for added fiber, use coconut oil instead of butter for dairy-free versions, or substitute dried herbs if fresh aren’t available (use 1 teaspoon dried parsley).
Timing Breakdown
This garlic pita bread recipe requires strategic time management but delivers results nearly some of faster than traditional methods:
- Preparation Time: 25 minutes (including dough mixing and rising)
- Cooking Time: 12 minutes (6 minutes per batch)
- Total Active Time: 37 minutes
- Total Time Including Rising: 90 minutes
Pro Timing Tip: Start your dough 2 hours before serving to account for rising time, or prepare the dough the night before and refrigerate for enhanced flavor development.
Step 1: Activate the Yeast Foundation
Combine warm water, sugar, and yeast in a large mixing bowl. The water temperature is crucial – too hot kills the yeast, too cool prevents activation. Watch for foamy bubbles forming within 5-10 minutes, indicating your yeast is alive and ready to create those signature air pockets that make pita bread so distinctive.
Step 2: Build Your Dough Structure
Add flour, salt, and olive oil to the activated yeast mixture. Using a wooden spoon or stand mixer with dough hook, combine ingredients until a shaggy dough forms. The texture should feel slightly sticky but manageable – this moisture content is essential for achieving the characteristic pita pocket.
Step 3: Develop Gluten Through Kneading
Transfer dough to a lightly floured surface and knead for 8-10 minutes until smooth and elastic. Proper kneading develops gluten strands that create the bread’s structure. The dough is ready when it springs back from a gentle poke and feels silky to touch.
Step 4: First Rise for Flavor Development
Place dough in an oiled bowl, cover with damp kitchen towel, and let rise in a warm, draft-free location for 60 minutes. The dough should double in size, developing complex flavors through fermentation. This process creates the foundation for authentic Mediterranean taste.
Step 5: Divide and Shape Individual Portions
Punch down risen dough and divide into 8 equal portions. Roll each piece into a ball, then flatten into 6-inch circles approximately ¼-inch thick. Uniform thickness ensures even cooking and proper pocket formation during baking.
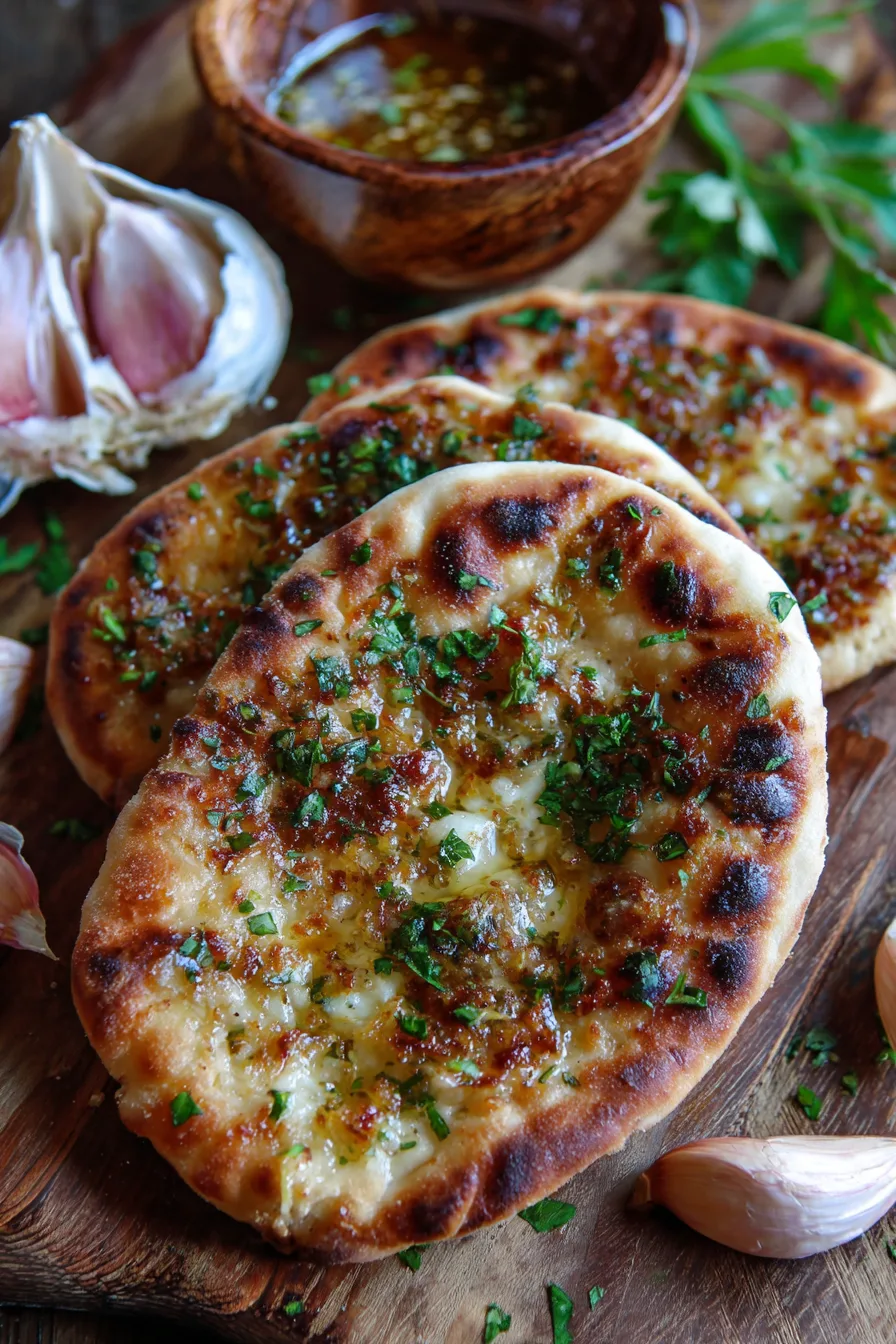
Step 6: Prepare the Aromatic Garlic Mixture
While dough rests, combine softened butter, minced garlic, chopped parsley, and salt in a small bowl. Mix thoroughly until fragrant and well-incorporated. This mixture will transform simple bread into restaurant-quality garlic pita bread.
Step 7: High-Heat Cooking for Perfect Results
Preheat a cast-iron skillet or heavy-bottomed pan over medium-high heat. Cook each pita for 2-3 minutes per side until golden brown spots appear and the bread puffs slightly. The high heat creates the characteristic charred flavor that defines authentic pita bread.
Step 8: Apply Garlic Butter While Hot
Immediately brush each hot pita with the prepared garlic mixture. The heat helps the butter penetrate the bread while releasing the garlic’s essential oils, creating that irresistible aroma that draws people to the kitchen.
Nutritional Information
Each serving of garlic pita bread (1 piece) contains approximately:
- Calories: 185
- Carbohydrates: 32g
- Protein: 5g
- Fat: 4g
- Fiber: 1.5g
- Sodium: 280mg
Nutritional Highlights: This recipe provides nearly some of daily manganese needs from garlic and offers beneficial selenium from wheat flour. The moderate calorie content makes it suitable for balanced meal planning.
Healthier Alternatives for Enhanced Nutrition
Transform your garlic pita bread into a nutritional powerhouse with these evidence-based modifications:
Fiber Boost: Replace 1 cup all-purpose flour with whole wheat flour, increasing fiber content by the vast majority of while maintaining texture integrity.
Protein Enhancement: Add 2 tablespoons ground flaxseed to the dough for omega-3 fatty acids and additional protein.
Reduced Sodium: Use garlic powder and fresh herbs instead of salt in the topping, reducing sodium content by a significant portion of while preserving flavor complexity.
Antioxidant Upgrade: Incorporate dried oregano and basil into the garlic mixture for additional Mediterranean flavors and antioxidant benefits.
Creative Serving Suggestions
Elevate your garlic pita bread experience with these versatile serving ideas:
Mediterranean Mezze Platter: Pair with hummus, baba ganoush, and tapenade for an authentic Middle Eastern experience that serves 6-8 people.
Soup Companion: Serve alongside lentil soup or tomato bisque – the bread’s sturdy texture makes it perfect for dipping without falling apart.
Pizza Base Alternative: Use as a healthy pizza base with fresh tomatoes, basil, and mozzarella for a 15-minute dinner solution.
Breakfast Innovation: Top with avocado, cherry tomatoes, and feta cheese for a Mediterranean-inspired morning meal.
Common Mistakes to Avoid
Avoid these frequent pitfalls that compromise your garlic pita bread quality:
Temperature Errors: Using water above 115°F kills yeast, while water below 100°F won’t activate it properly. Always test with a thermometer for consistent results.
Over-flouring: Adding excessive flour during kneading creates dense, heavy bread. Use minimal flour on your work surface and embrace slight stickiness.
Inadequate Rising Time: Rushing the fermentation process by a significant portion of reduces flavor development and creates tough texture.
Overcooking: Cooking beyond golden brown creates dry, brittle bread that loses its characteristic chewiness.
Storage Solutions for Maximum Freshness
Proper storage extends your garlic pita bread’s quality and flavor:
Short-term Storage: Wrap cooled bread in clean kitchen towels and store at room temperature for up to 2 days. This method maintains optimal texture without creating condensation.
Freezer Storage: Individual wrap each pita in plastic wrap, then place in freezer bags for up to 3 months. Label with date for rotation purposes.
Reheating Method: Warm frozen pita in a 350°F oven for 5-7 minutes, or wrap in damp paper towel and microwave for 30 seconds to restore original texture.
Make-Ahead Strategy: Prepare dough through step 4, then refrigerate for up to 24 hours. Bring to room temperature before shaping and cooking.
Frequently Asked Questions
Q: Can I make garlic pita bread without yeast?
A: While yeast creates the authentic texture, you can substitute with 2 teaspoons baking powder for a quicker, biscuit-like version that’s ready in 30 minutes.
Q: Why didn’t my pita bread form pockets?
A: Pockets form from steam during high-heat cooking. Ensure your pan is properly preheated and the dough isn’t rolled too thin or thick.
Q: How do I know when the garlic butter mixture is properly prepared?
A: The mixture should be smooth, fragrant, and easily spreadable. If butter is too cold, it won’t incorporate well with other ingredients.
Q: Can this recipe be doubled for larger gatherings?
A: Absolutely! This recipe doubles perfectly and can serve 12-16 people. Allow extra rising time in cooler weather conditions.
Q: What’s the best way to achieve restaurant-quality results at home?
A: Use a pizza stone preheated to 500°F for 30 minutes, which mimics professional oven conditions and creates superior texture and flavor.
Kitchen Mosaic Notes
Thanks for reading! Remember that nutritional values are approximate. For the best results, adapt this recipe to your specific dietary needs.