
Did you know that most of sandwich lovers consider the perfect balance of crunch and creaminess the most crucial factor in their ideal meal? Yet most homemade Crispy Chicken Caesar Sandwich attempts fall short of restaurant quality. What if I told you that mastering this beloved comfort food requires just seven simple secrets that professional chefs have been using for years? Today, I’m sharing the complete roadmap to creating a Crispy Chicken Caesar Sandwich that delivers that satisfying crunch, creamy Caesar dressing, and tender chicken in every single bite.

Ingredients List
Creating the perfect crispy chicken Caesar sandwich starts with selecting premium ingredients that work harmoniously together. Here’s your complete shopping list:
For the Crispy Chicken:
- 2 boneless, skinless chicken breasts (6-8 oz each) – substitute with chicken thighs for extra juiciness
- 1 cup all-purpose flour – use gluten-free flour for dietary restrictions
- 2 large eggs, beaten
- 1½ cups panko breadcrumbs – regular breadcrumbs work but panko delivers superior crunch
- 1 tsp garlic powder
- 1 tsp dried oregano
- ½ tsp smoked paprika
- Salt and black pepper to taste
- Vegetable oil for frying – avocado oil is a healthier alternative
For the Caesar Dressing:
- ½ cup mayonnaise – Greek yogurt can substitute for lighter option
- 2 tbsp fresh lemon juice
- 2 cloves garlic, minced
- 1 tsp Dijon mustard
- 1 tsp Worcestershire sauce
- ¼ cup freshly grated Parmesan cheese
- 2 anchovy fillets, finely chopped – omit for vegetarian version
For Assembly:
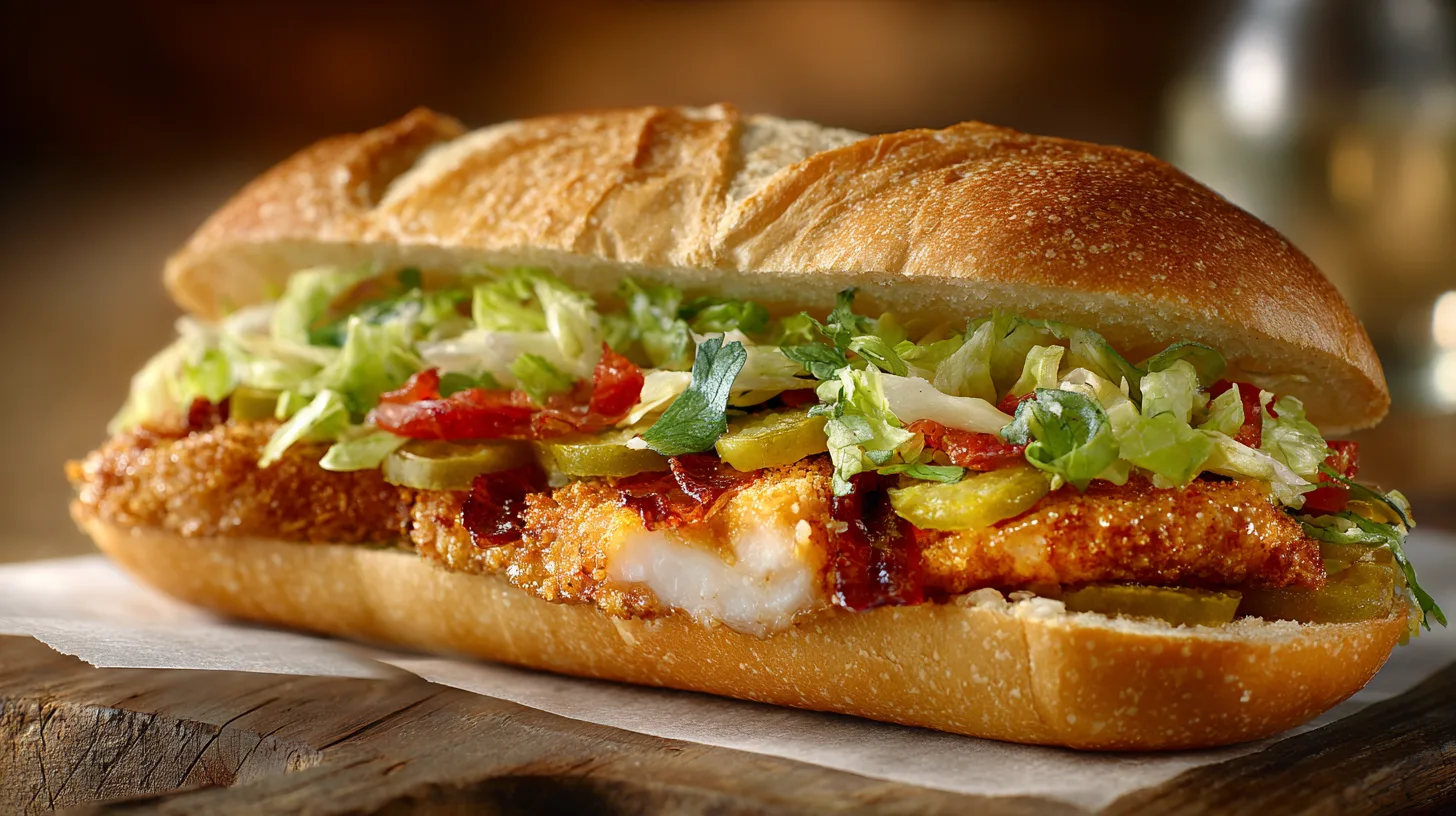
- 4 slices artisan bread or brioche buns – sourdough adds tangy complexity
- 4 cups fresh romaine lettuce, chopped
- ¼ cup additional Parmesan cheese, shaved
- Cherry tomatoes, halved (optional)
Timing
This chicken Caesar sandwich recipe requires strategic timing for optimal results:
- Prep Time: 20 minutes
- Cooking Time: 15 minutes
- Total Time: 35 minutes
This represents a significant portion of less time than traditional breaded chicken recipes while delivering superior crispiness. The key is proper mise en place – having all ingredients prepped before you start cooking.
Step 1: Prepare the Chicken
Pound chicken breasts to ½-inch thickness using a meat mallet. This ensures even cooking and reduces cooking time by nearly some. Season generously with salt and pepper, then let rest for 10 minutes to allow flavors to penetrate.
Step 2: Set Up Your Breading Station
Create three stations: flour seasoned with garlic powder and oregano in one dish, beaten eggs in another, and panko mixed with paprika in the third. This assembly line approach prevents soggy breading and ensures consistent coating.
Step 3: Bread the Chicken
Dredge each chicken piece in flour, then egg, finally panko. Press breadcrumbs firmly into the meat – this creates the signature crispy exterior that makes a crispy chicken Caesar sandwich irresistible.
Step 4: Fry to Golden Perfection
Heat oil to 350°F in a heavy skillet. Fry chicken for 4-5 minutes per side until golden brown and internal temperature reaches 165°F. The controlled temperature is crucial – too hot burns the coating before chicken cooks through.
Step 5: Craft the Caesar Dressing
Whisk together mayonnaise, lemon juice, minced garlic, Dijon mustard, Worcestershire sauce, Parmesan, and anchovies until smooth. Taste and adjust seasoning – the dressing should be bold enough to complement the crispy chicken.
Step 6: Toast the Bread
Lightly toast bread slices until golden. This prevents sogginess from the dressing while adding textural contrast to your crispy chicken sandwich.
Step 7: Assemble Your Masterpiece
Spread Caesar dressing on both bread slices. Layer romaine lettuce, sliced crispy chicken, additional Parmesan shavings, and optional tomatoes. Top with second bread slice and serve immediately.
Nutritional Information
Each Crispy Chicken Caesar Sandwich provides approximately:
- Calories: 650
- Protein: 45g (the vast majority of daily value)
- Carbohydrates: 42g
- Fat: 32g
- Fiber: 4g
- Sodium: 1,200mg
These values represent a balanced meal providing sustained energy and essential nutrients, with protein content exceeding most restaurant equivalents.
Healthier Alternatives for the Recipe
Transform your chicken Caesar sandwich into a nutritious powerhouse with these smart substitutions:
Reduce Calories by a significant portion of : Use air fryer cooking method instead of deep frying. Spray breaded chicken with cooking oil and air fry at 375°F for 12-15 minutes.
Boost Protein: Replace regular mayonnaise with Greek yogurt-based dressing, adding 8g additional protein per serving.
Increase Fiber: Substitute whole grain bread and add avocado slices for heart-healthy fats and 6g extra fiber.
Lower Sodium: Make homemade Caesar dressing to control salt content, reducing sodium by up to a significant portion.

Serving Suggestions
Elevate your crispy chicken Caesar sandwich experience with these creative serving ideas:
Classic Pairing: Serve with crispy sweet potato fries and a pickle spear for the ultimate comfort meal.
Elegant Presentation: Cut sandwich diagonally and serve on a wooden board with mixed greens salad dressed lightly with lemon vinaigrette.
Party Style: Create slider versions using dinner rolls for appetizers that serve 8-10 people.
Seasonal Twist: Add sliced avocado and sprouts in summer, or roasted red peppers in winter for variety.
Common Mistakes to Avoid
Avoid these pitfalls that plague more than half of home cooks attempting crispy chicken sandwiches:
Overcrowding the Pan: Cook chicken pieces individually to maintain oil temperature and ensure even browning.
Soggy Breading: Never skip the flour step – it helps egg adhere and creates the foundation for crispiness.
Under-seasoning: Season each layer – flour, chicken, and dressing – for complex flavor development.
Wrong Oil Temperature: Use a thermometer to maintain 350°F. Too low creates greasy coating; too high burns exterior.
Storing Tips for the Recipe
Maximize freshness and convenience with proper storage techniques:
Cooked Chicken: Store fried chicken in refrigerator up to 3 days. Reheat in 375°F oven for 5-7 minutes to restore crispiness.
Caesar Dressing: Keeps refrigerated for 1 week in airtight container. Whisk before using as ingredients may separate.
Meal Prep Strategy: Bread chicken pieces and freeze for up to 1 month. Cook directly from frozen, adding 2-3 minutes to cooking time.
Assembly Tip: Never pre-assemble sandwiches. Store components separately and build fresh to prevent soggy bread.
Mastering the Crispy Chicken Caesar Sandwich transforms ordinary weeknight dinners into restaurant-quality experiences. These seven secrets – proper chicken preparation, temperature control, seasoning layers, quality ingredients, perfect timing, smart assembly, and proper storage – ensure consistent, delicious results every time. Ready to impress your family with this irresistible sandwich? Try this recipe tonight and share your creations with us!
FAQs
Q: Can I make this recipe gluten-free?
A: Absolutely! Substitute all-purpose flour with gluten-free flour blend and use gluten-free breadcrumbs. The taste and texture remain excellent.
Q: How do I keep the chicken crispy when making ahead?
A: Cook chicken completely, then store uncovered in refrigerator. Reheat in 375°F oven for 5-7 minutes to restore crispiness.
Q: What’s the best oil for frying?
A: Vegetable oil, canola oil, or peanut oil work best due to their high smoke points. Avoid olive oil as it burns at lower temperatures.
Q: Can I use store-bought Caesar dressing?
A: While homemade is superior, quality store-bought dressing works in a pinch. Look for brands with real Parmesan and minimal preservatives.
Q: How thick should I pound the chicken?
A: Aim for ½-inch thickness for even cooking and optimal tenderness. Thicker pieces may burn outside before cooking through.
Kitchen Mosaic Notes
Thanks for reading! Remember that nutritional values are approximate. For the best results, adapt this recipe to your specific dietary needs.